You can easily integrate with Streambird Auth OAuth flow for your user login/register without managing things like Google OAuth Integration.

1 - Setup Google OAuth Connection

In order to integrate with Google OAuth flow, you will first need to setup your Google OAuth Connection via the Streambird Portal. You will have to create an Google Cloud Project and create an OAuth app in order to retrieve Client ID and Client Secret. You can follow the guide in the OAuth Connection section for Google.

2 - Configure Redirect URLs

Once your Google OAuth Connection is created and configured, you will need to ensure that you create Redirect URLs for login and registration. This redirect url will be used once the OAuth Provider calls the Streambird Callback URL we provided to you during the OAuth Connection setup.

For security reasons, we only allow you to use redirect URL preconfigured with Streambird to ensure that we redirect your users to redirect_urls you whitelisted with us once we receive the callback request from the OAuth Provider.

3 - Begin Google OAuth flow

With your OAuth Connection and Redirect URLs properly setup, you can start embedding the response from the following request into your UI (typically a “Login with Google” button).

OAuth style login UI


In this example, we assume you are calling Streambird Auth API from your client-side via our SDK or your custom frontend Api Client. We will be using your PublicToken, which is publishable.

https://api.streambird.io/v1/auth/oauth/google/begin?public_token={{public_token}}&redirect=true

With the redirect=true parameter, we allow you to embed a single static URL for your button and Streambird API will automatically redirect the browser to the generated OAuth Login URL for the OAuth provider. For example

https://accounts.google.com/o/oauth2/auth/oauthchooseaccount?access_type=offline&client_id=1008100163226-56ujvvb72rat1rieggmi1kqepqpsjdsn.apps.googleusercontent.com&redirect_uri=http%3A%2F%2Flocalhost%3A11019%2Fv1%2Fauth%2Foauth%2Fcallback%2F6e7c9f1b-5e66-400c-99a7-783411e03aac&response_type=code&scope=openid%20email%20profile&state=google-eEQJNqnJcyvHwGxLmaf8URLElSHcYYzEsZMrXJnEoWufiOiZotcNT7YY4ZzUwUvq&flowName=GeneralOAuthFlow

Optional: Handle your own redirect

Optionally, if you prefer to retrieve the redirect_url yourself and handle the redirect in your own frontend logic, do the following

cURL
curl --location -g --request GET 'https://api.streambird.io/v1/auth/oauth/google/begin?public_token={{public_token}}'

If successful, the response will contain a redirect_url that you can use to initiate the Google OAuth flow.

JSON
{
	"redirect_url": "https://accounts.google.com/o/oauth2/auth/oauthchooseaccount?access_type=offline&client_id=1008100163226-56ujvvb72rat1rieggmi1kqepqpsjdsn.apps.googleusercontent.com&redirect_uri=http%3A%2F%2Flocalhost%3A11019%2Fv1%2Fauth%2Foauth%2Fcallback%2F6e7c9f1b-5e66-400c-99a7-783411e03aac&response_type=code&scope=openid%20email%20profile&state=google-eEQJNqnJcyvHwGxLmaf8URLElSHcYYzEsZMrXJnEoWufiOiZotcNT7YY4ZzUwUvq&flowName=GeneralOAuthFlow"
}

Embed this redirect_url into any button that initiates a Google OAuth flow.

Once the Google OAuth flow has begun, the user will see the Google login screen like below.
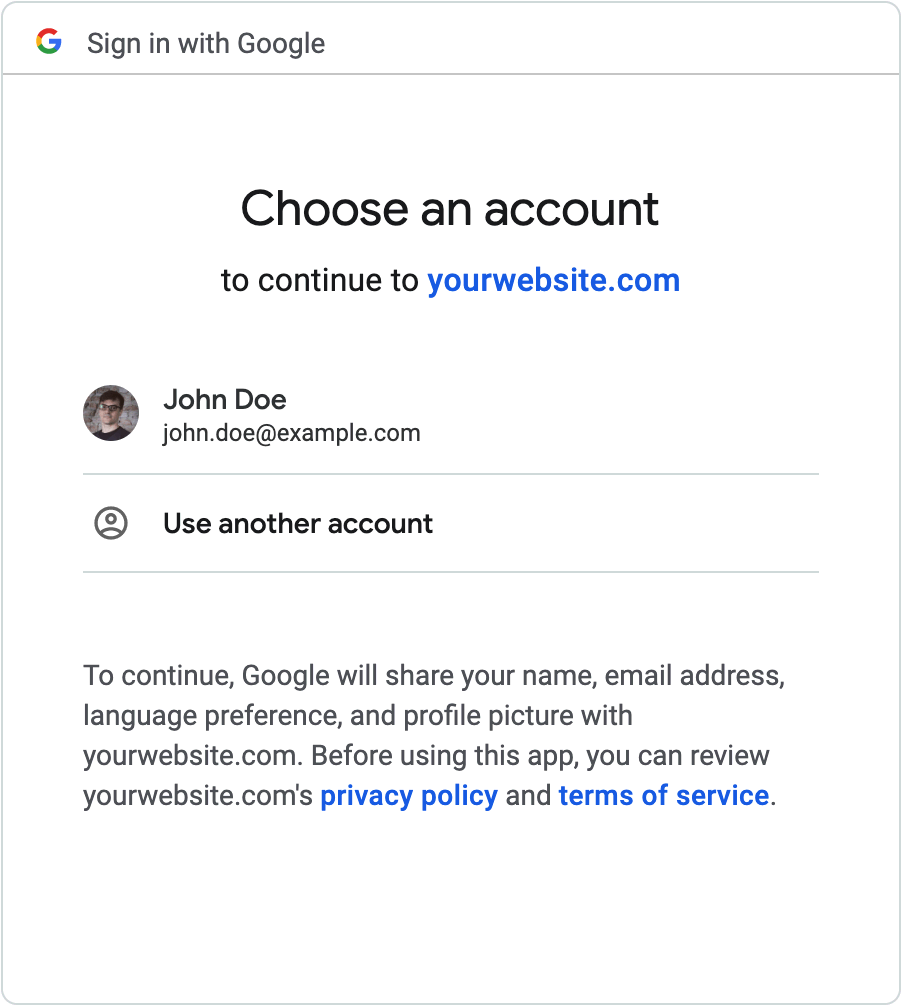
Sign in with Google

4 - Verify OAuth Request

Once the OAuth login is successful, the OAuth Provider will first make a request to our callback URL in the Streambird Auth API (the one you pasted in while setting up the OAuth application with Google). Once the Streambird Auth API callback verified the user information, we will redirect the user to either the registration or login Redirect URL you setup depending on whether it is a new user or an existing user on the Streambird Platform under your App.

Once you have extracted the token generated by Streambird in your Redirect URL, verify the token against Streambird Auth API like below.

In this example, we assume you are calling Streambird Auth API from your backend/server side. Please ensure that you NEVER expose your ApiKey

cURL
curl --location -g --request POST 'https://api.streambird.io/v1/auth/oauth/verify' \
--header 'Authorization: Bearer sk_test_KJuRUZmh1XC342h1n39gH84MuSZDyD13NfhtDkaY6IfwpQA0H' \
--data-raw '{
	"token": "b79KRfPMHJnNLE2er42GBDqto5bBl7LpRMXegYIbh7hRxe2sRGFu8JD3szqrMLpA"
}'

A successfully response will return an OAuthSession object with provided info from the idp (identity provider) and also the internal Streambird user_id (see example response below).

JSON

{
    "provider_subject": "100157402424066154830",
    "provider": "google",
    "user_id": "user_24wFP9pDa9YiMJLun94iKykoZs2",
    "idp_session": {
        "idp": {
            "access_token": "ya29.A0ARrdaM9TnNfrdqDZmBIw7PBPjYf0HELFdxDCNC2cQRK7aqgsIfIusuCd0SJ5nx9dgGti2KU-rt_dIV7cpxasqpCpRq7VNyv-KsbC2-cn6j76p_wVmUwCKlWZ_3ZHx8WFdlIrLu-E1q3Ea_11zfmQCBMl",
            "refresh_token": "1//0d2jmQJmy0z17CgYIARAAGA0SNwF-L9IrF-jEvfwE-YNr_--Cqzu7MGnmLu0kklcFfgJzI2FSBib9_4wh1MAs4JKbAvue2XJoI"
        }
    },
    "session": null,
    "session_token": ""
}

Optionally, if you want to use Streambird’s Session management, you can request Streambird to issue you a session token in the VerifyOAuthToken step by sending in a session_expires_in parameter like the following.

cURL
curl --location -g --request POST 'https://api.streambird.io/v1/auth/oauth/verify' \
--header 'Authorization: Bearer sk_test_KJuRUZmh1XC342h1n39gH84MuSZDyD13NfhtDkaY6IfwpQA0H' \
--data-raw '{
    "token": "b79KRfPMHJnNLE2er42GBDqto5bBl7LpRMXegYIbh7hRxe2sRGFu8JD3szqrMLpA",
    "session_expires_in": 1440
}'

A successful response will contain a session object with session_token and session_jwt like the following response. Your can read more about Session management here on how to leverage Streambird’s Session management for multifactor authentication flow.

We recommend ensuring that you store our auto generated User ID from the response into your database/backend in a column or field against that user (as long as you can associate your user with the auto generated ID returned by Streambird). Streambird will ensure that each email is ONLY attached to a single user at any time.

If you have previously associated our Streambird user_id with your users in your app, you are now done and you can safely authenticate the user by issuing a valid session or a JWT token!

However, if you have not previously attached the user_id to your users table for example, you can also use our GetIdentityUser endpoint to retrieve the emails and phone_numbers attached to the user using the user_id returned.

cURL
curl --location --request GET 'https://api.streambird.io/v1/auth/users/user_24wFP9pDa9YiMJLun94iKykoZs2' \
--header 'Authorization: Bearer sk_test_KJuRUZmh1XC342h1n39gH84MuSZDyD13NfhtDkaY6IfwpQA0H'

and expect a sample response like below,

JSON
{
    "user_id": "user_24wFP9pDa9YiMJLun94iKykoZs2",
    "app_id": "app_24ydphdixx2ydhF0E5WUFUKWNqi",
    "first_name": "John",
    "middle_name": "",
    "last_name": "Smith",
    "active": false,
    "updated_at": 1627081626,
    "created_at": 1627081626,
    "emails": [
        {
            "id": "email_24oXBL3PufzHkH1Jzyjc2EXYeo7",
            "verified": true,
            "email": "johnsmith@example.com",
            "updated_at": 1627081626,
            "created_at": 1627081626
        }
    ],
    "phone_numbers": [
        {
            "id": "pn_24oXBLRv6BoHXbNZoTAZkAFlRsy",
            "verified": false,
            "phone_number": "+14152222222",
            "updated_at": 1627081626,
            "created_at": 1627081626
        }
    ]
}

Now, with the email or other identification info you want to rely on, you can attach the user_id from Streambird to your User entry in your own database and issue a valid session or JWT token or if you are using Streambird session management, return our session_token or session_jwt.